Ahhh bread…. What can beat the smell of freshly baked bread in the morning, or the taste of a slice of hot buttered toast? Wheat flour is such a major part of our diet, but how much do you know about how it’s produced?
Paul Lovatt Smith explains how he’s able to get from a bag of seeds to a loaf of seeded bread without ever leaving his home.
(Note that this is a 2023 update on the original 2020 post)
What can beat the smell of baking, or the taste of a slice of buttered toast? Or the joy that a birthday cake brings or that moment when a pizza comes out of the oven? Wheat flour is such a major part of our diet, yet our involvement in, and knowledge of its production tends to be minimal.
One of the goals I had in mind when I started to grow my own food was to try to include bread. Wheat and cereals are an integral part of the traditional/organic farming system that I wanted to try. When I learnt that wheat flour is among the most pesticide-ridden foods that we eat, this made me even more determined. After 18 years of experimentation, failures and successes my method has more or less stabilised to the point where I feel that I can share it with an unsuspecting public, although please note that other methods are available.
In common with a lot of my farming, I’ve found that the methods which work best on a small scale are a far cry from those used by my commercial neighbours. In fact, they would be more familiar to a prehistoric farmer than a modern one. This is largely to do with scale: when you are growing enough for yourself only, you can use hand tools. When you use hand tools, growing becomes an end in itself. High yields are not the be-all and end-all. Weeds are less of a problem. That said, some mechanisation is very helpful, as you will understand if you read on.
Using the natural fertility of the soil is a key part of the method that I use. For much of this I have to thank the German biodynamic farmer, Friedrich Wenz, whom I was lucky enough to meet when he gave a one-day course on his methods at Tablehurst Farm, Forest Row, a few years ago. I have never met a farmer with a more close understanding of the soil. My method has largely followed his from then on, with consistently good results. It is a “minimum tillage” method which leaves all but the top inch or two of the soil undisturbed, to get the benefit from its natural fertility. No chemicals are used.
The other thing to consider is the choice of variety. I have tried many different ones, including hard red wheat bought in packets from health food shops, and modern commercial white varieties either bought commercially or cadged off farming friends. However long-straw heritage grains are my favourite. Not only are they more flavoursome, but they are also more practical: their length means that they tend to out-compete weeds, are more resistant to being eaten by birds and also involve less bending down to harvest by hand – more on this later. I was lucky to be able to get hold of a few kg of April bearded wheat from John Letts, the heritage grain guru, via an SFTG member in 2015. Ever since, I have been using saved seed from this original stock. Using saved seed builds up resilience and diversity – something that John strongly advocates.
I should also say that I have only ever grown spring wheat, not winter wheat. Again, this puts me in the prehistoric farmer camp, as records show that their wheat used to be sown in spring. I think that spring wheat better fits with the traditional farming calendar. If wheat is following a cover crop, sheep can graze all winter, thereby maximising vegetation cover which benefits soil health and therefore fertility. Or it can follow outdoor-reared seasonal pigs. Spring wheat also reduces the problem of pest damage during the winter, particularly by slugs.
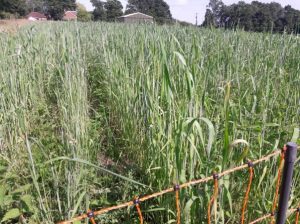
Now, to the details of the method: Option 1, following a cover crop. The cover crop has two functions: firstly it ensures that the soil is healthy and fertile – the longer that soil is left bare of vegetation, the less life and fertility there is. Secondly the crop residue provides fertility. In dry April weather, cultivate down to a shallow depth of, say a couple of inches. This chops the roots and kills the cover crop, produces a mulch of soil mixed with vegetation and leaves the soil below intact and therefore alive and fertile. My cover crop has always been grass, either permanent pasture or a rye/clover ley. I have rotavated with a 2-wheel tractor but now have a 4-wheeler. In good pasture soil, two or maybe three passes with the rotavator on its shallowest setting are enough. Top tips – make the passes perpendicular to each other and don’t go too slow. Experiment with the back flap open/half closed.

Figure 1 Rotavated pasture after 3 passes, April 2017
At this stage, Wenz applies a liquid spray of essential micro-organisms which helps the cut vegetation to decompose without putrefying. This spray is made from charcoal, soil, raw milk, yeast molasses and other such good stuff. I think this is more important if, like Wenz, your cover crop is quite tall and the mulch is therefore high in vegetable volume. Wenz’s cover crops are a complex mix of specially chosen herbs and grasses, some of which are nitrogen-fixing.
Option 2: following outdoor pigs. With this method, although the patch remains bare throughout the winter, fertility is enhanced by the dung of the pigs. Also, cultivation is easier than with the cover crop method, as the soil is already semi-cultivated by the digging of the pigs which act as biological ploughs. We keep 3 weaner pigs for 5 months (June-November) on a 500 square meter enclosure of fresh pasture. By the time they leave, this area is totally turned over. By April, some vegetation is beginning to grow back and the soil life has had time to recover somewhat. Cultivation with 2 passes of the rotavator on its shallowest setting is more than sufficient to prepare for sowing.
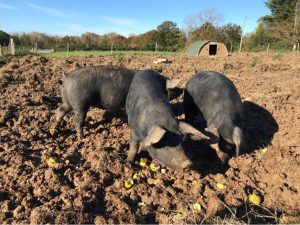
Figure 2 Outdoor pigs, November 2021
Now you are ready to sow. The seed must be placed as near as possible to the top of the undisturbed soil because it can then absorb the maximum amount of the soil’s moisture, germinate quickly and root into soil which has all its life and structure intact. Some sort of drills is an option (see the Planet Junior hand drill in the photo) but for quality and assurance, there is nothing to beat digging a furrow and sowing by hand. This can be done with a builder’s mattock (or an old man’s tooth as I have heard it called) with the spike ground off to save weight. This is quite hard work, or, to look at it another way, good exercise. The mechanised alternative is to use a ridging plough. For my alpine tractor, I have fitted a ridging plough and a depth wheel onto a horizontal implement bar attached to the 3-point linkage. This makes a furrow a foot away from the tractor tyre. When I had a pedestrian (two-wheel) tractor I made furrows with a ridging plough implement.
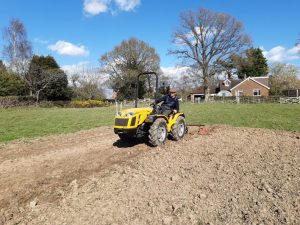
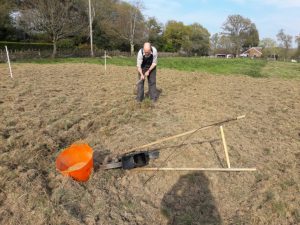
Figure 4 Digging furrows with a tractor and depth-controlled ridging plough (above) and mattock (below) in April
When I have made a furrow, I clean it out by hand to expose the undisturbed soil. Then I sow by dribbling the seed into the furrow. My rows are 1 foot apart and I use one handful per 6 meters. This equates to a sowing rate of around 220 kg per hectare. You can reduce the row spacing if you want a greater yield per hectare. Then dig your next furrow before covering over the previous one by kicking the ridge back in. If digging by hand, keep one foot in the previous row, then you will get a consistent row spacing.
By burying the seed in furrows, bird predation is much reduced, especially since birds are particularly hungry in early Spring. I have tried broadcasting followed by harrowing and agree with the old saying about the wastefulness of this method: “One for the rook, one for the crow, one to rot and one to grow”. Top tip – always stand on the side that you have planted as this will help cover and pack down the rows which helps retain moisture.
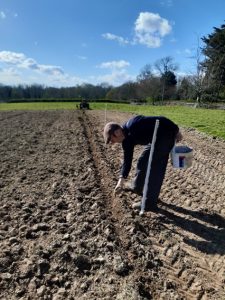
Figure 5 Sowing in a cleaned-our furrow, April 2022
The seedlings should emerge in about 10 days. You will need to protect your growing wheat against mammals especially rabbits, badgers and deer. The best way to do this is electric fencing, which can be taken up for mowing (I use the cheapest push mower) 3 or 4 times during the growing season. I use rabbit netting which comes in 40m lengths. If you have deer you may need to add one or two strands on top.
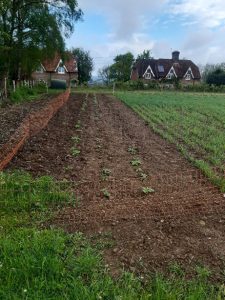
Figure 6 Potatoes and wheat emerging, May 2019
After the wheat germinates, I usually do 2 or three quick passes with a chisel hoe to deal with creeping thistles but apart from this, the beauty of this method is that you can now leave your wheat alone until harvest time and just enjoy watching it and its wild companions grow. Other vegetation will grow as an understorey but because the wheat germinates quickly, it should get away from this. The “weeds” in the understorey are hated and chemically killed by commercial farmers because they reduce yield and contaminate the grain. If you want a shock, visit a field of commercial wheat in July which will be as free from any life, other than one species of plant, as a slab of concrete. In traditional or organic farming however, the understorey becomes the cover crop for the following year and also provides a haven for wildlife. As the summer progresses you will see a wealth of interesting insects taking residence in your crop.
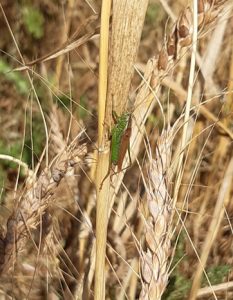
Figure 7 Bush cricket, August 2022
If all goes well, by late August you should be seeing your wheat turn a golden yellow. Test the ripeness by biting a few grains – it’s ripe when it’s hard and crunchy. Now for more prehistoric fun: we harvest the wheat in the same way reported by Roman historians of the Celts – by snapping off the ears. This is the most efficient, least wasteful and most enjoyable and sociable way of harvesting that we have found. It takes about half an hour to pick 10 meters of row, which should yield enough wheat for a 500g loaf. This is working on the basis of a 6-fold increase from the weight of seed. If this all sounds mad, just ask yourself: what else would I be doing on a sunny August afternoon? It’s a great opportunity for a chat and we now have several friends who are picking addicts. Top tip: get a good straw hat.
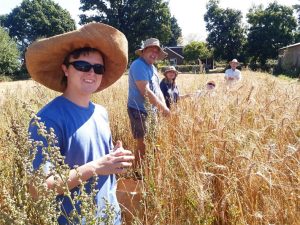
Figure 8 Picking wheat, August 2022
If the weather is rainy and you have to harvest moist grain, you can dry it on a tarpaulin in the sun and wind. We do this on our flat roof, which prevents the chickens getting at it. A few hours drying on a sunny day in August or September will suffice.
Store your ears in paper/breathable sacks somewhere safe and dry while you consider the next hurdle in the process: threshing. The un-mechanised method is to put your ears on a sturdy tarpaulin or dry mud floor and hit them with a flail or stamp on them. Then sieve out the chaff and winnow the grain in the wind using buckets and dustbin lids. Repeat until you have acceptably clean grain. Many years ago a bemused neighbour and I did just this, using traditional jointed threshing flails, made from holly by my clever brother-in-law Raymond. It is what our ancestors used to do all winter long in threshing barns. It was aerobic and fun, if a little dangerous. After that I found a steam powered thresher at our local transport show, owned by the Burgess family from Cross-in-Hand, who were kind enough to put my wheat through. Eventually, having seen one in action in Pakistan, I took the plunge and bought a stationary 5 HP thresher from a firm called Basant in Agra, India, which was shipped over for a total cost of around £2,500. I call it the Taj Mahal and it’s probably the only one in the country. It can be powered from a tractor PTO and works very well. Available for hire to local growers!
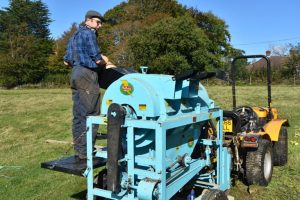
Figure 9 Threshing ears with Pasquali tractor and Vidhata stationary thresher, September 2021
Nearly there. Keep your grain safe from rats and mice until you need some flour. I have an electric mill made in France which cost £250 many years ago and is still going strong. It can grind different grades of flour or meal so is useful for other purposes. It consists of a hopper which feeds into a compartment with a rotating metal bar enclosed in a sieve. When the flour is fine enough it falls through the sieve into the plastic barrel below. It’s not considered as good for the baking quality as stone-ground flour because it warms up the grain a bit but it does the trick for me. I usually mill around 5kg at a time. There are a few working wind and water mills in the local area which may be amenable to carry out this task for you.
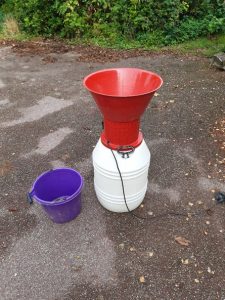
Figure 10 Small electric mill
Baking with heritage wheat is a whole subject in itself. It is not as “strong” as shop-bought bread flour so to get it to rise sufficiently for bread and pizza dough I mix my flour 70:30 with shop-bought white flour and also add some Vitamin C powder. However, no cutting with white flour is necessary for flatbread, which is really easy to make – just mix flour and water and bake on a hot plate in minutes – and taste great with stews. (This is how our ancestors made bread for several thousand years before risen bread was invented.) Quiche bases also work well with wholemeal flour. Heritage wheat has a nutty flavour and different glutens to modern varieties. Some say it is better for those with gluten intolerance. But the main thing is that, as many of you will know, it’s truly satisfying to eat food which you have (mostly) grown yourself, without chemicals. Go on, give it a try, I dare you!
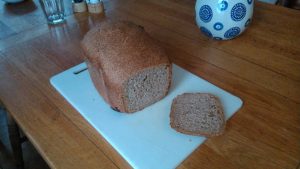
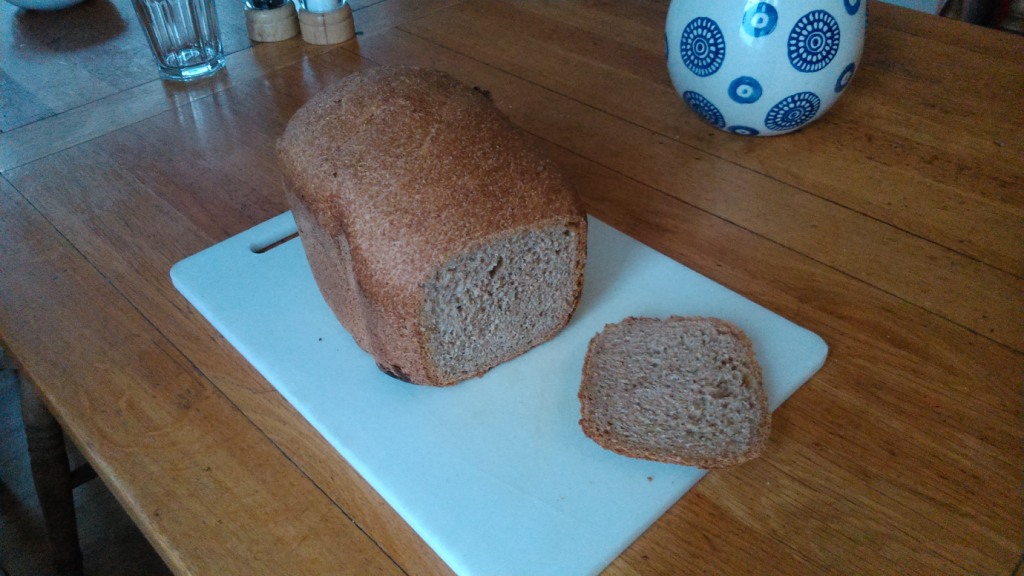
Figure 11 70/30 wholemeal/white loaf, 2018
PS I have made a series of videos on this subject on my Youtube channel, which is called Paul LS.